
| 일 | 월 | 화 | 수 | 목 | 금 | 토 |
|---|---|---|---|---|---|---|
| 1 | 2 | 3 | 4 | 5 | ||
| 6 | 7 | 8 | 9 | 10 | 11 | 12 |
| 13 | 14 | 15 | 16 | 17 | 18 | 19 |
| 20 | 21 | 22 | 23 | 24 | 25 | 26 |
| 27 | 28 | 29 | 30 |
- 오블완
- RSI
- 디자인패턴
- 디자인 패턴
- 볼린저 밴드
- pyQT
- pyqt6
- next.js
- Flutter
- ai
- 변동성 기반 지표
- 플러터
- 행동패턴
- front-end
- 소프트웨어공학
- frontend
- 추세 기반 지표
- 티스토리챌린지
- LLM
- ccxt
- Design Patterns
- design pattern
- 비트코인
- 구조패턴
- MACD
- adx
- Python
- 모멘텀 기반 지표
- 어댑터 패턴
- behavioral pattern
변혁적인 삶
[Python | GUI] 3. PyQt6 버튼 이벤트 처리와 동적 동작 구현 본문
[Python | PyQt6 ] 3. 버튼 이벤트 처리와 동적 동작 구현
목차
- 1. 버튼 이벤트 처리란?
- 2. PyQt6에서 버튼 이벤트 연결
- 3. 동적 동작 구현 예제
- 4. uic.loadUiType()으로 UI 파일 가져오기
- 5. 마무리
이번 포스팅에서는 PyQt6에서 버튼 클릭 이벤트를 처리하고 동적 동작을 구현하는 방법에 대해 알아보겠습니다. 버튼은 사용자의 입력을 받는 가장 기본적인 위젯이며, 이를 통해 다양한 동작을 구현할 수 있습니다. 기본적으로 GUI는 코드로 구현하며 4장에서 UI 파일을 가져와 이벤트 처리와 동적 동작을 구현하는 방법에 대해 설명할 예정입니다.
1. 버튼 이벤트 처리란?
버튼 이벤트 처리는 버튼 클릭과 같은 사용자 상호작용에 응답하여 특정 코드를 실행하는 것을 의미합니다. PyQt6에서는 이벤트 처리에 시그널-슬롯 메커니즘을 사용합니다.
- 시그널: 사용자 입력(클릭, 키보드 입력 등) 또는 프로그램 동작에 의해 발생하는 이벤트.
- 슬롯: 시그널이 발생했을 때 호출되는 함수 또는 메서드.
2. PyQt6에서 버튼 이벤트 연결
2-1. 기본 코드
PyQt6에서 버튼 이벤트를 연결하려면, 버튼의 `clicked` 시그널과 이를 처리할 메서드(슬롯)를 연결해야 합니다. 아래는 기본 구조입니다.
from PyQt6.QtWidgets import QApplication, QMainWindow, QPushButton
class MyWindow(QMainWindow):
    def __init__(self):
        super().__init__()
        # 버튼 생성
        self.button = QPushButton("Click Me", self)
        self.button.setGeometry(50, 50, 200, 50)  # 버튼 위치와 크기 설정

        # 버튼 시그널과 슬롯 연결
        self.button.clicked.connect(self.on_button_click)

    def on_button_click(self):
    	print("Button was clicked!")  # 버튼 클릭 시 실행되는 동작

app = QApplication([])
window = MyWindow()
window.show()
app.exec()
2-2. 실행 결과
위 코드를 실행하면 "Click Me" 버튼이 생성됩니다. 버튼을 클릭하면 콘솔에 "Button was clicked!"가 출력됩니다.
3. 동적 동작 구현 예제
3-1. 버튼 클릭 시 라벨 변경
이번에는 버튼을 클릭했을 때 라벨의 텍스트를 변경하는 예제를 살펴보겠습니다.
from PyQt6.QtWidgets import QApplication, QMainWindow, QPushButton, QLabel
class MyWindow(QMainWindow):
def __init__(self):
super().__init__()
# 라벨 생성
self.label = QLabel("Hello, PyQt6!", self)
self.label.setGeometry(50, 50, 200, 50)
# 버튼 생성
self.button = QPushButton("Change Text", self)
self.button.setGeometry(50, 120, 200, 50)
# 버튼 클릭 이벤트 연결
self.button.clicked.connect(self.change_label_text)
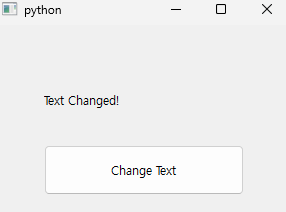
def change_label_text(self):
self.label.setText("Text Changed!") # 라벨 텍스트 변경
app = QApplication([])
window = MyWindow()
window.show()
app.exec()3-2. 실행 결과
"Change Text" 버튼을 클릭하면 라벨의 텍스트(Hello, PyQt6!)가
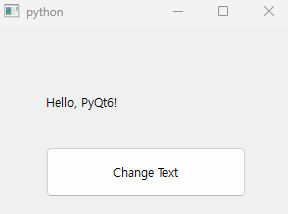
"Text Changed!"로 변경됩니다.
3-3. 여러 버튼 추가
추가적으로, 여러 버튼을 생성하고 각각 다른 동작을 연결할 수도 있습니다:
from PyQt6.QtWidgets import QApplication, QMainWindow, QPushButton, QLabel

class MyWindow(QMainWindow):
	def __init__(self):
    	super().__init__()
        self.label = QLabel("Choose an option:", self)
        self.label.setGeometry(50, 50, 200, 50)

        self.button1 = QPushButton("Option 1", self)
        self.button1.setGeometry(50, 120, 100, 50)
        self.button1.clicked.connect(self.option1_selected)

        self.button2 = QPushButton("Option 2", self)
        self.button2.setGeometry(160, 120, 100, 50)
        self.button2.clicked.connect(self.option2_selected)

    def option1_selected(self):
        self.label.setText("Option 1 Selected")

    def option2_selected(self):
        self.label.setText("Option 2 Selected")

app = QApplication([])
window = MyWindow()
window.show()
app.exec()
4. uic.loadUiType()으로 UI 파일 가져오기
4-1. UI 파일 로드와 버튼 이벤트
저번 시간에 배운 PyQt6의 uic.loadUiType()을 사용하여 XML 기반의 UI 파일을 Python 클래스 형태로 로드해 동적 이벤트 처리를 해봅시다.
아래는 버튼 클릭 이벤트를 처리하는 예제입니다:
from PyQt6 import uic
from PyQt6.QtWidgets import QApplication, QMainWindow

# UI 파일 로드
form_class = uic.loadUiType("./ui/btn_click_test.ui")[0]

class MyWindow(QMainWindow, form_class):
	def __init__(self):
    	super().__init__()
        self.setupUi(self) # UI 초기화
    	self.pushButton.clicked.connect(self.on_button_click) # 버튼 이벤트 연결

	def on_button_click(self):
    	self.label.setText("Button Clicked!")  # 버튼 클릭 시 라벨 텍스트 변경

app = QApplication([])
window = MyWindow()
window.show()
app.exec()
4-2. UI 파일 설명
위 코드에서 사용된 UI 파일 btn_click_test.ui는 다음과 같은 구조를 가집니다:
<?xml version="1.0" encoding="UTF-8"?>
<ui version="4.0">
    <class>MainWindow</class>
    <widget class="QMainWindow" name="MainWindow">
        <property name="geometry">
            <rect>
                <x>0</x>
                <y>0</y>
                <width>400</width>
                <height>300</height>
            </rect>
        </property>
        <widget class="QWidget" name="centralwidget">
            <widget class="QPushButton" name="pushButton">
                <property name="geometry">
                    <rect>
                        <x>150</x>
                        <y>100</y>
                        <width>100</width>
                        <height>50</height>
                    </rect>
                </property>
                <property name="text">
                    <string>Click Me</string>
                </property>
            </widget>
            <widget class="QLabel" name="label">
                <property name="geometry">
                    <rect>
                        <x>150</x>
                        <y>50</y>
                        <width>100</width>
                        <height>30</height>
                    </rect>
                </property>
                <property name="text">
                    <string>Hello</string>
                </property>
            </widget>
        </widget>
        <resources/>
        <connections/>
    </widget>
</ui>
4-3. 실행 결과
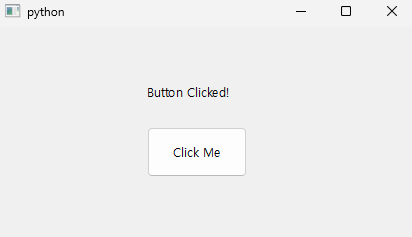
위 코드를 실행하면 다음과 같은 동작이 수행됩니다:
- 처음 창이 실행되면 "Hello"라는 텍스트가 표시됩니다.
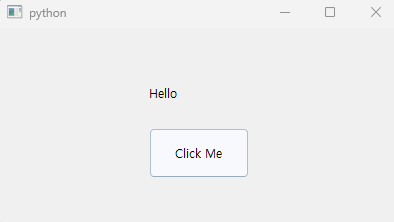
- "Click Me" 버튼을 클릭하면 라벨의 텍스트가 "Button Clicked!"로 변경됩니다.
5. 마무리
이번 포스팅에서는 PyQt6에서 `uic.loadUiType()`을 사용하여 UI 파일을 로드하고 버튼 클릭 이벤트를 처리하는 방법을 살펴보았습니다. 이 방법은 UI 설계를 XML로 관리하면서도 동적 이벤트를 쉽게 처리할 수 있는 강력한 도구입니다. 다음 시간에는 더 복잡한 이벤트 처리와 다중 위젯 간 상호작용을 다뤄보겠습니다. 😊
'프로그래밍 > Python' 카테고리의 다른 글
| [Python | 크롤링] 동적 페이지 확인 방법 (0) | 2024.12.16 |
|---|---|
| [Python | GUI ] 2. UI 파일을 Python에서 직접 로드하여 사용하기 (1) | 2024.11.27 |
| [Python | GUI ] 1. PyQt6, Qt Designer를 이용한 GUI 프로그래밍 (0) | 2024.11.26 |
| [Python | 유틸리티] tqdm으로 프로그래스 바를 추가해보자! (0) | 2024.11.17 |
| [Python | 패키지 관리] Poetry란 무엇인가? (0) | 2024.11.16 |


